We bought our house in 2007 when it was at it's lowest point. We're architects, so we didn't judge it for that. We knew what we could do and we saw what it could be. (I'm working hard to track down pictures of the way it used to be, but that'll hopefully be another story.) Anyway, we would never have bought a house that had to be completely reinvented and turned into something it never was. We wanted to fix up a place that already had that special something. This house had it. It came with a way of life.
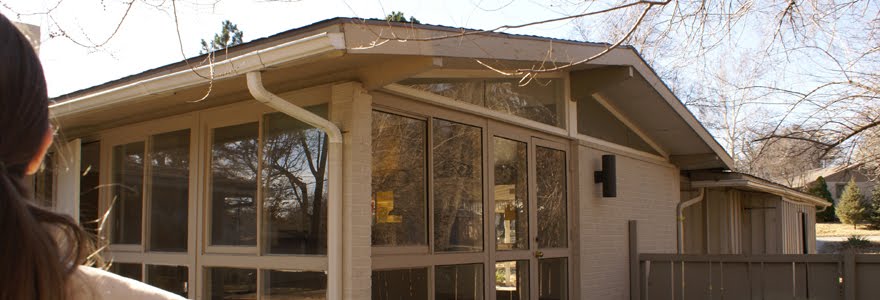
Cliff May is often dubbed the Father of the Ranch Style. If you understand what makes these designs so special, you wouldn't have to be told that they were invented in California. Windows go from the floor to the ceiling and there are as many of them as possible. They were painted the same color as the walls so the frame of the window would not stand out, but rather the visual opening. Even the doors have panes of glass like the windows and there are as many of those as possible as well. The most important thing about this house is that when you are inside, you still feel like you're outside. You cannot escape the daylight when it arrives in the morning and you cannot convince your children to sleep before it sets. It is also a very efficient home, leaving a small 1,300sf footprint in my yard that makes you realize how much more less really is.
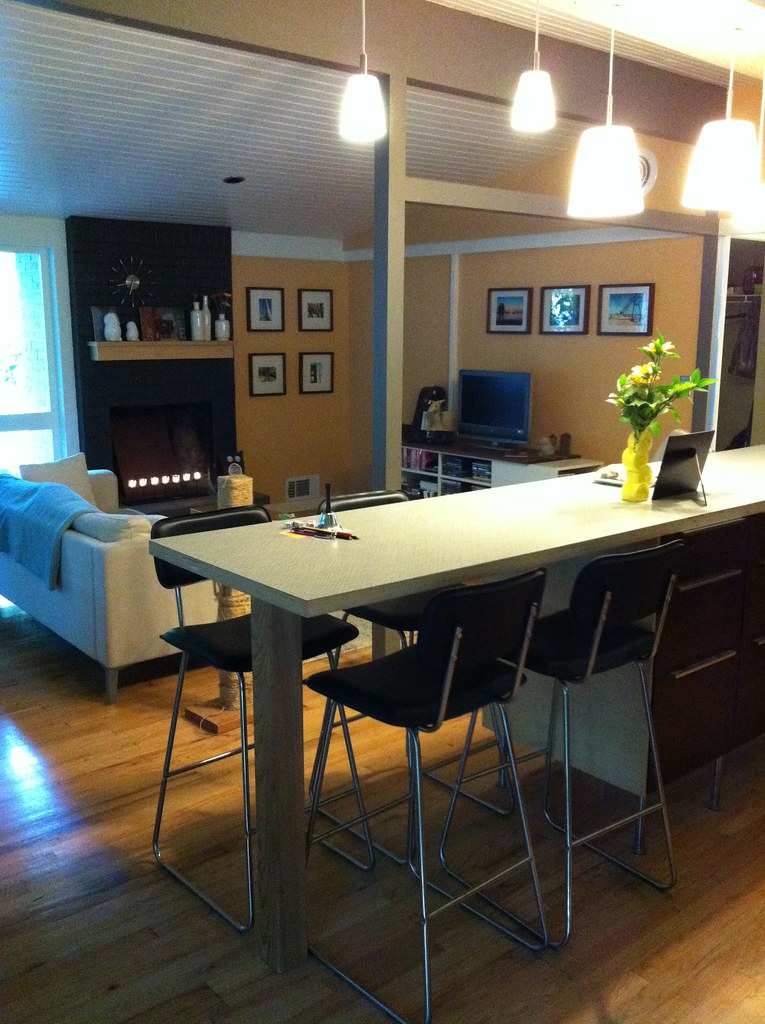
This house is everything we ever hoped our home could be, except more. This house makes me want to go outside. A morning of clear sunshine after the gloomy winters we call "gray death" puts you in a mood to just grab your bike and take off. This house makes me want vegetable and flower gardens or to throw parties large enough that not everyone even has to fit inside to still feel like they're all at the same party. It's changed us. We even listen to bossa nova from time to time because it feels so right in this house.
The problem is that we've spent so much time working on the house, it hasn't left us much time to grow a garden or take off biking on the weekends, on the occasions when we actually have weather appropriate for either. The smell of spring doesn't remind me of lazing around in my hammock, but it strongly reminds me of the first two springs we owned this house when we worked all day long together from early in the morning until we had just enough energy left to change into pajamas at night. In that way, our house is a tease because we are now addicted to a lifestyle or at least this idea of a lifestyle that we haven't really been able to achieve. Of course we're so close to finishing, but I have the most wonderful child and now I'd just so much rather have another and maybe another than replace windows, though I will admit that the days when Zack and I used to do that together were some of my favorite days.
We are thinking of selling our house because of this. We at least know what we want if and when we move on. We have developed an irrational need for windows and as many of them as possible. We also know what it takes to feel like your outside when you're stuck inside and what the value of a well placed garden might be if we were ever blessed with time enough to have one. I don't want to stop living here, but I think this house has taught us everything it knows and changed us entirely. We now know what it takes to live happy and we want the opportunity to do it. Unfortunately, this means changing our situation from one where we work on the house to one where we simply enjoy a house where we can have more children and less projects.
The strange thing is that thinking of letting it go is less scary than I thought it would be. This house has defined us for so long that people are shocked to hear that we'd ever sell it, but the thing that we've most appreciated is the thing that can never be sold. It's the Cliff May Way of Life.
We are living in a Cliff May that we've been remodeling to suit us and it has in turn changed us.
Monday, March 18, 2013
Saturday, December 1, 2012
Cliff May Christmas
I thought I'd post a few pictures of our house all decked out for Christmas. This is about as decked out as we get with a kiddo and cats running about.


Tuesday, November 27, 2012
Window Replacement... Awning Windows and Custom Built Assemblies!
It's been over a year since I've posted and I will write another post soon to explain what all we've done and what all we have left to do. Right now, I'm finally posting about a topic so near and dear to my heart, it took me a while to write it out the way I wanted... WINDOWS! We still have one punched opening to replace still and plenty of the full-height windows, but we have done quite a bit of work so I wanted to share what we've learned to help anyone else know what to do or perhaps what not to do!
Just to explain why we had to replace all of our windows (for those of you who live where there's always fabulous weather): here in Kansas, the single-pane windows freeze over on the inside from condensation in the winter. When it's really cold, we can't see outside from our living room except through the insulated kitchen awning window we put in. Also, wood sliders don't hold up here. Ours never opened. The wood swells with temperature changes and varying humidity levels and we found as we demolished some of them that the metal parts inside had rusted out almost entirely so even if the wood was still the right size and shape, they wouldn't have opened anyway. We also require screens on our windows to keep the flying bugs out and the kitty cats in. So we didn't rip the windows out and throw them away because we didn't love them. We really did! But the point of them was to create a positive relationship between the inside and outside and in our case, the existing windows were creating a completely negative relationship!
Replacing the Sliders
This part was easy thanks to Andersen Windows having a standard size that fits the opening just perfectly! It doesn't appear on their website that they even do standard sizes anymore so in case you're ordering your own, the ones we got were 59 3/4" x 31 1/2" actually (I think they were called 60x32) and they worked great for us. It left just enough shim space and wiggle room in the existing opening. The only dilemma we've had with this style of window is how to trim it out. Because they just barely fit in a 2x4 wall, it took us a while to come up with a good way of trimming the interior out that seemed consistent with the trim throughout the house. Here are some photos and a section I sketched up real quick:


Replacing the Door/Full Height Windows
We got our door from Trustyle, which had a door type that matched the existing only we wouldn't be able to see daylight through this one! After careful measuring and finger crossing, we selected the TSL2020 2'-8" x 6'-6" x 1 3/4". Then we bought some 4x4 Douglas Fir posts and fitted these out to act as our door jamb just as the original doors were designed, only we used a 4x4 post on each side for stability. Our original post was completely rotted out at the bottom (most likely from water condensation). Here are some photos:


So we ripped those out and built the frames exactly the way we took them out: from the outside in one piece that overlaps the structural frame. This worked out much better. We designed them to fit 5/8" thick insulated glass so we used 2x4s for the window frames with 1x trim on the back that would overlap the glass 3/4" and then a stop on the outside. Here is a section once again a section drawn very quickly and some photos:


Just to explain why we had to replace all of our windows (for those of you who live where there's always fabulous weather): here in Kansas, the single-pane windows freeze over on the inside from condensation in the winter. When it's really cold, we can't see outside from our living room except through the insulated kitchen awning window we put in. Also, wood sliders don't hold up here. Ours never opened. The wood swells with temperature changes and varying humidity levels and we found as we demolished some of them that the metal parts inside had rusted out almost entirely so even if the wood was still the right size and shape, they wouldn't have opened anyway. We also require screens on our windows to keep the flying bugs out and the kitty cats in. So we didn't rip the windows out and throw them away because we didn't love them. We really did! But the point of them was to create a positive relationship between the inside and outside and in our case, the existing windows were creating a completely negative relationship!
Replacing the Sliders
This part was easy thanks to Andersen Windows having a standard size that fits the opening just perfectly! It doesn't appear on their website that they even do standard sizes anymore so in case you're ordering your own, the ones we got were 59 3/4" x 31 1/2" actually (I think they were called 60x32) and they worked great for us. It left just enough shim space and wiggle room in the existing opening. The only dilemma we've had with this style of window is how to trim it out. Because they just barely fit in a 2x4 wall, it took us a while to come up with a good way of trimming the interior out that seemed consistent with the trim throughout the house. Here are some photos and a section I sketched up real quick:


Replacing the Door/Full Height Windows
We got our door from Trustyle, which had a door type that matched the existing only we wouldn't be able to see daylight through this one! After careful measuring and finger crossing, we selected the TSL2020 2'-8" x 6'-6" x 1 3/4". Then we bought some 4x4 Douglas Fir posts and fitted these out to act as our door jamb just as the original doors were designed, only we used a 4x4 post on each side for stability. Our original post was completely rotted out at the bottom (most likely from water condensation). Here are some photos:


Once we got the posts in place after hours of measuring and fitting, we then proceeded to build the windows completely wrong. The way the original windows were made, they were installed from the outside on the face of the "frame." You can see where they were installed in the photos above. What we did wrong was to build the frames in place in between the "frame" members. We thought this would be easiest for some reason. It pretty much worked out though until we made another huge mistake. When ordering the insulated glass, we were not told and didn't realize that the seal on the insulated glass was about 5/8" thick. We'd counted on having about 3/8" overlap of the stops. See below for the disastrous results (of course we realized our error after completing the entire wall of windows).


The most frustrating part of the whole experience was that it was so hard to find information about doing this. It turned out to be not such a big deal, but we wasted a lot of time and money figuring that out. Making your own windows is not rocket science. It's as simple as you'd expect. There just isn't any info online and people look at you crazy when you even mention it. So it was really important for me to write this super long post so that anyone else in a similar situation can see that it can be done! I'll probably write another post about how we finished out the door frame. You wouldn't BELIEVE the looks you get when you tell people that the 4x4s are the door frame and you just need the door and the parts and pieces, not a whole jamb! Yikes!
Anyway, we LOVE LOVE LOVE our awning windows and we especially LOVE LOVE our master bedroom full height windows and fully functioning door!
Saturday, November 19, 2011


It's been a while
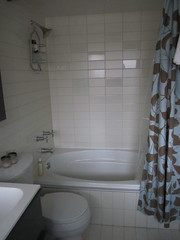
We've obviously fallen behind on our updating because we decided to have a baby! We had a mad rush to finish up the master bedroom and bathroom before he was born and are now putting the finishing touches on his room and the guest room (now that he's 6 months old!).
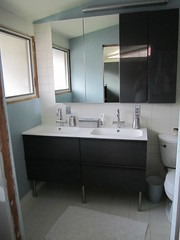
Here are some pics of the master bathroom. We're still missing doors and window trim, but it's pretty close.
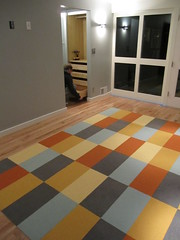
Here are some photos of the master bedroom before we moved a bunch of furniture in. We replaced the sliders (that never slid) with awning windows, made the bathroom bigger by taking out one of the closets, replacing it with what was a hall closet I think, and we rebuilt the floor-to-ceiling windows and put in a new door from TruStile.
Here are some pics of the master bathroom. We're still missing doors and window trim, but it's pretty close.
Here are some photos of the master bedroom before we moved a bunch of furniture in. We replaced the sliders (that never slid) with awning windows, made the bathroom bigger by taking out one of the closets, replacing it with what was a hall closet I think, and we rebuilt the floor-to-ceiling windows and put in a new door from TruStile.
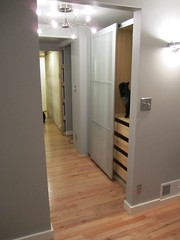
And there's a picture from our entryway. I'll post pics of the empty but nearly complete nursery shortly!
Wednesday, September 23, 2009
Master Bedroom
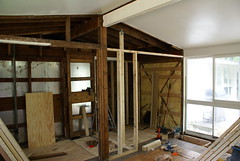
It's been gutted (almost) and the framing's almost done although I didn't get a picture of that yet. We're putting in our awning windows this weekend or next and really soon, we'll be rebuilding those floor to ceiling windows so they'll look very similar, but they'll be insulated so they won't ice over in the winter! We've got so many projects going on right now and I want them all done before it gets cold!
Sunday, April 19, 2009
New Mantle!

The mantle before...

And after...


Subscribe to:
Posts (Atom)